09 10

Thursday, April 11, 2013

{Travel} Mr H turns 31

A couple of weekends ago, I surprised Mr H with a trip to one of our new favorite mountain getaways to celebrate his 31st birthday-Old Edwards Inn and Spa. OEI is located in the town of Highlands, North Carolina which is situated on a plateau in the southern Appalachian Mountains, within the Nantahala National Forest. The weather is mild and the views are to-die-for. It is often rainy with a mystical fog settled down on the town.  For us, this only adds to the romance and old world European charm of the property.


(Hello, sexy legs.  He may kill me for this . . .reading The Economist, of course)

The drive to OEI is characterized by 5-8 miles of winding mountain roads with beautiful waterfalls emerging on either side of the drive.


Some of the waterfalls were only visible from the road while others had parking lots and pull-offs like the one pictured, above.  It is truly an amazing drive.

There are several different types of accomodations at OEI:  historic main inn, the Lodge, private cottages.  We have chosen to stay at The Lodge the times that we have been because it seems to be more private with larger rooms.  However, all options are beyond beautiful.

The Lodge has a main building where there's a lobby, butler's pantry (stocked with complementary soda, tea, coffee, fruit and Dove ice cream bars-we had a few . . .okay more than a few :)), and wrap around double-decker porch with rockers.  On the Lodge grounds, though, there are individual cabins (think, luxury summer camp) that contain living rooms, fireplaces, jetted tubs, patios/sunrooms and heated bathroom floors.  YES!  HEATED BATHROOM FLOOR TILES! (we never knew how nice of an amenity that is until we stayed here).


The Lodge-front porch


The Lodge-lobby
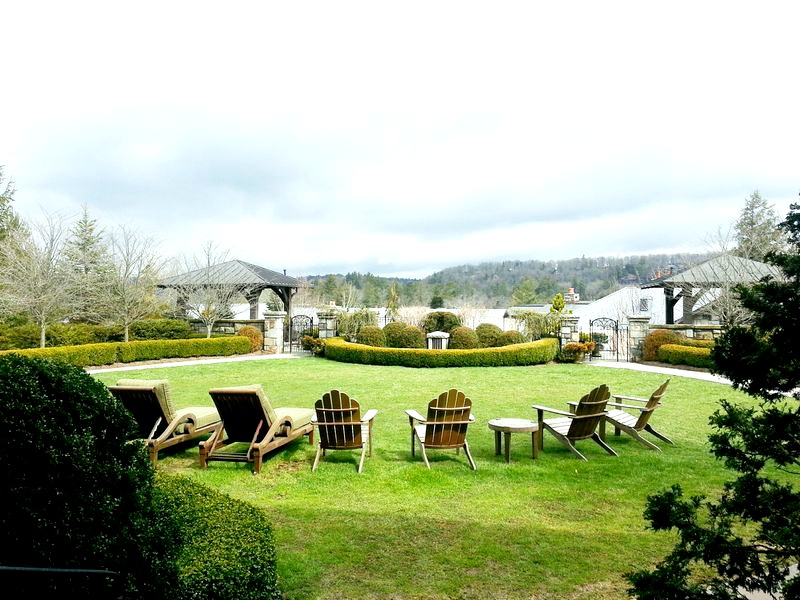

The Lodge-looking out on the croquet lawn from the front porch

We did play a little croquet.  Someone might have let someone win because it was his birthday ;)


(looks like he'd rather be playing golf)

Our room was beautifully adorned with period antiques.


Chest in our room

I enjoyed sitting out in our sunroom in the mornings with a cup of coffee.


OEI has many amenities and activities:  tennis, golf, 2 outdoor mineral pools, fitness center with group classes, horseback riding, flyfishing, and the amazing . . .heart skip a beat . . .spa.

There are no words to describe how nice this spa is.  It is definitely the best amenity at OEI (and the main reason why we go).  The best part of this amenity is that you DO NOT have to purchase a spa service to enjoy all of the facilities that the spa has to offer.  There are men and women's separate areas with large swiss showers, dry and wet saunas, hot tubs, etc.  And outside of these rooms, there are beautiful "meditation rooms" complete with waterfall features and fireplaces. 


Spa living room

We purchased the Rainforest Rejuvenation spa service since it was Mr H's birthday (we were in a steam chamber where we rubbed different exfoliants and muds on eachother.  Sorry mom and dad ;))  But the majority of our spa time was spent together, reading a book, with a view like this:


We were so spoiled.  I asked for some hot tea . .  .and poof


Terrrible back lighting, but this is the look of total relaxation:


The food at OEI is truly amazing, as well.  We ate dinner and breakfast in their signature restaurant, Madison's (french toast and their thick sliced bacon is a must for breakfast).


Madison's lobby (I just die over the decor at this inn)

Madison's lobby-Love their mix of textures and colors


Madison's restaurant-I just die over this granite stone wall

Breakfast for the Birthday boy

OEI really sets themselves apart with their customer service and attention to detail.  They greeted us by name at every meal and made it a point to say "Happy Birthday Mr. Hazelwood" every time they passed.  In addition to that, they surprised us both with a beatiful dinner table setup for our upcoming wedding anniversary.


(Seriously?  Rose petals?  Sigh .  . .)

And when we returned to our room later that night . . .


Rose petals at turn-down.  You had me at rose . . .petal.

It is important to take the time to pamper yourself and the ones that you love, from time to time.  I did my best, along with OEI, to pamper and spoil my husband for his birthday weekend.  He works long hours to provide for our family (as do I :)) and I wanted to show him my appreciation.  And while we have only been married a year (WHOA . . .anniversary coming up!), and shouldn't need a "reset" button, OEI and Highlands gave us time to better connect with eachother and escape from our demanding professional lives for a weekend.

OEI has officially been added to our "favorites, hope to frequent" list and I can't wait to make many more wonderful memories with this husband, that I love so much:


(P.S.  How old are we that we needed coffee to stay awake during the after-dinner live music?)

So while I'm feeling mushy and nostalgic, go hug on those that you love.  We never know what tomorrow will bring.

(I am neither sponsored nor paid by OEI for this post)

xoxo

Monday, April 8, 2013

{DIY} Garage Door Update

Welcome back! I hope all of you readers have had a great couple of weeks. The weather has been so nice the last few days so Mr H and I have tried to stay outside as much as possible (when we haven't been on the road!). Saturday night, I styled and helped my parents throw a spring cookout at their house (bad blogger because I didn't take pictures). We played cornhole, roasted marshmallows and had an incredible spread of food including fresh squeezed lemonade.

Has this amazing  weather inspired any of you to tackle some outdoor projects? I have a few  projects up my sleeve to share with you in the next few weeks.  The project I'm going to share with you today was completed this weekend.  We aren't fortunate enough yet to have a garage of our own, so I borrowed my parent's for this reveal:


Mr H and I were in Home Depot color matching paint for an upcoming project (stay tuned!!!!) when we came across a garage door accessory kit (Crown Bolt Traditional Decorative Garage Hardware Kit) for $19.99.  I have a love-hate relationship with garage doors.  I love their functionality (especially during snowy blizzards) but hate their aluminumy (yes that's a word), eye-soreness.  If you are lucky enough to own a carriage door style garage, kudos to you. For those that aren't so lucky, this DIY is for you!

 My parents graciously sacrificed their garage door for one of the easiest, fastest, DIY projects I've completed, to date.

 All you need is the garage door hardware kit and a drill.


Oh, and you need a garage door too (thanks mom and dad!).


The kit comes with all of the screws you should need depending on the depth of your garage door. For my parent's door, the smallest screws worked best.

On the back of the kit, the manufacturer gives suggestions on how to space/arrange the hardware.  One important thing to remember is that the door still needs to function!  Do not mount the hardware across a seam.  If you do, you'll have a pretty garage door . . .that won't raise.

Drill your holes (dad's hand made it onto the blog) once you've decided on spacing and place 3 screws on each piece of hardware (notice the seam line that we avoided under the hardware).

We chose to place 2 of these pieces on each side (for a total of 4).

After completing these side pieces, we drilled holes and attached the decorative handles once again avoiding the garage door seams.  You may wonder if the handles clear the opening when the garage door is raised-and I am happy to announce that they do!

While it is not quite as pretty as a true carriage style door, it is an amazing transformation for only $20!!

Here she is, all dressed up:

 And because I enjoy looking at this 15 minute transformation, here are a few more images:


I'll update you with more pictures when they've tackled their outdoor cleanup and their landscape and gardens are in full bloom.

Now, run don't walk to Home Depot to get this kit and drill some holes in your garage door!  You might want to check with your parents first before poking holes in theirs :)

FYI-If you've had trouble leaving comments on my blog posts anonymously, that issue should now be resolved.  Please keep me updated should you find a problem. 

xoxo 

Monday, March 18, 2013

Buffet Upcycle ~ Use What You Have

Welcome back! First and foremost, I apologize for the time that has passed since my last post. We had a death in the family so Mr H and I have been spending a lot of time with our families the last few weeks. And I must say, while everyone's hearts were saddened at our loss, we truly enjoyed the time that it allowed us to spend together playing games and reminiscing (Phase 10 and Sequence are family favorites!). I'm going to try and make up for my absence with a few extra project posts.

Today's post is about a concept that I'm desperately trying to embrace in my life-"Use what you have." One of the goals that I have set for myself this year is to: re-purpose what I have, restore what someone else had and splurge only on what I love

Yes, I would love to walk into both Pottery Barn and Restoration Hardware and say "I'll take one of everything." However, this is neither practical nor good for my young marriage - Mr H may kill me! So, I'm determined to make furniture that I have work by giving it a facelift, bringing furniture from a thrift store back to life, and splurging only when I fall in love with a piece. With that being said, I am going to try to avoid buying a piece of furniture (or anything for that matter) just to "make do" until I find something better.


Example 1:  Dark, Tired, Buffet

I bought this sofa table a million years ago at Target.

Before

Technically, this is a sofa table but it has been used as a desk and most recently as a buffet in our dining room (please ignore the tabletop decor as it was in the process of being transitioned to Spring).  I was/am tired of all of the dark wood furniture in our place so instead of hunting for a new buffet or sideboard, I decided to "upcycle" this guy by giving him a much-needed facelift.

Ever since I incorporated gold and gray as a color combination in my wedding decor, I have been in love with the combined hues!  So, I started with a light gray with beige undertones - Fieldstone by Benjamin Moore.


I am a BIG fan of this Behr Premium Paint and Primer in one (Home Depot color matched the paint).  While it is slightly more expensive ($14 for 1 quart), my experience so far has been that it cuts the number of coats needed by at least 1/2. 

Next, I ordered some gold drawer cup pulls from a hardware store online called Amerock.  I have ordered several pieces of hardware from this store online and have been very pleased with the price, quality and delivery time.


These drawer cups were about $2 each and I ordered a total of 3.

I applied the paint with a foam roller for even coverage and to eliminate brush-stroke marks.  A small foam brush was used for the detail on the fronts of the drawers.  After about 2 hours, 2 coats of paint (allowing 1/2 hour drying time between coats), and attaching some new hardware bling, this buffet got a major facelift:

After

For roughly $20, this buffet transformed from drab to fab!  The dining room has really benefited and brightened from this upcycle.  Here are some more shots of the new Spring vignette:


I staged the table with things I just collected from around our place-trying to keep it light and fresh.


I love the way the gold hardware brings out the beige warmth in the gray.


Nothing says Spring like some fresh cut flowers.  Submerging a stem of green leaves inside a glass vase filled with water can be an unexpected floral addition.  In this glass vase, I just contoured and wrapped the stem along the inside wall of the vase.


If you follow me on instagram (lori_bluegrasspearls), you may have seen the gold frame and mat that I scored at a thrift store for 75 cents!!  That's so cheap for a frame PLUS a mat!  I'm not sure yet what will end up in this frame, but I have some ideas.


I have not sealed it yet with a protective coating.  I'm going to watch the piece and try to decide if I think that it needs it.  If you paint a piece of furniture that gets a lot of use or activity, I would definitely seal it (Minwax Water-Based Polycrylic Protective Finish in “Clear Gloss” is a favorite).

Now, a final before and after (so you don't have to scroll up again):

Kitty cat tested and approved.

Source List:
Paint - Fieldstone by Benjamin Moore
Table - Target (not available anymore)
Cup drawer pulls - Amerock online
Silver candlesticks - wedding present from Pottery Barn
Lamp - Home Goods (many years ago)
White "H" pitcher - wedding present from Pottery Barn
Decorative grey "H" - Restoration Hardware
White platter - Pottery Barn
Seagrass market tote - boutique in Seaside, FL
Chair - TJ Max
Throw pillow - Target
Throw blanket - Target

I hope you enjoyed seeing an upcycle of an existing piece of furniture in our home.  What are your thoughts?  Have you upcycled a piece of existing furniture from your home before or are you more likely to go find something new for the space?

Happy restoring and recycling!

xoxo

Sunday, February 24, 2013

{DIY} Painted Toy Animals

We've had a pretty quiet but fun weekend here complete with a visit from a special friend from college for a date night filled with reminiscing. The sunshine was a nice and welcome change.

Today's DIY is a two-parter. There are pictures all over Pinterest of the growing trend of painted animal figurines. So, today I tried my hand at a DIY animal toy makeover.

Part I

To begin this DIY, I made a trip to the store I despise the most-Walmart.  The truth is, it takes patience of steel for me to get in and out of this store without having a complete meltdown.  Just ask Mr. H.  The aisles are too skinny and the store overcrowded.  Just not my idea of a fun shopping experience.  With that said, it is common knowledge that Walmart has everything!  So after unsuccessful trips to the Dollar Tree and Target, I decided to give ole Wally World a chance in hopes of finding the perfect sized plastic animal toys.

I found these guys for $1 each.

Before (poor giraffe. Excuse my poor photography)

They also have lions, tigers . . .no bears (can't help myself).  But oh my, I was most drawn to the elephant, giraffe and naturally the horse.

To be completely honest, I bought these little guys on Saturday but never made it home with them.  After the excitement of finding the perfect sized animals for the perfect cost,  I apparently left the bag that they were in hanging in the carousel of shopping bags at the express checkout counter.  Has this ever happened to you?  I thought I double-checked every bag in that carousel!  Words can't describe the frustration!

Anyway, due to my complete obsession with gold I decided to try a new product out on these guys-liquid gold leaf.


I picked up this liquid gold leaf at Hobby Lobby for about $4.00.

I chose the horse to be the liquid gold leaf guinea pig:


The application was so easy with a small paint brush.  And, a little bit of gold leaf goes a long way.  It only took about 2-3 dips of the paint brush in the pot of leaf to coat this stallion.

Here he is in all of his golden glory:

After

 Here are a couple shots of this golden beauty in an equestrian vignette on the buffet:


Next up, the elephant.  Same application, same beautiful and easy results.

After

And who could forget about the giraffe.  Sometimes they all like to hang out in the jungle together on the dining room table:


Don't they look fun and chic?  I can see these figurines perched on bookshelves in a beautiful nursery (out of the reach of children-not sure gold leaf should be ingested), as table decor at a baby shower or just as a fun addition to a coffee table.

I found similarly painted plastic toy Elephants on Etsy for $25.00 - $33.00 each. For just a little more than $1 each, these are an easy and inexpensive DIY project to add some whimsy and fancy to a room.  

Part 2

Now, this part incorporates painting some smaller plastic toy animals with organization.

I searched for some smaller plastic toy animals and found a set of 3, white, paintable guys at a Kroger Marketplace for about $3.

While at Hobby Lobby buying the liquid gold leaf, I picked up 3 mason jars for about $2.50 each.  

 
 And also this pink spray paint on sale-30% off:


I knew I wanted a shiny gloss finish in a fun color for this DIY.

I used a hot melt glue gun to secure the mason jar seal to the metal ring.  Then I placed a dot of hot melt glue on each hoof to secure one animal per jar lid.

Before

After about 2-3 coats of spray paint, we have fun organization store-all's for a kids room or your own!

After

You can really choose any color you'd like.  I'd recommend a high gloss paint for this glossy shine effect.

 
These are so fun for a kids room to corral anything from hair bows and ponytail holders to rubber bands and paperclips.


For about $3.50 each, these animal-topped mason jars are unique and functional.  I may make myself some for the office in a glossy gold-of course.

Hope you've had a great weekend and feel inspired to go rummage through your little one's toy chests and paint some plastic animals - make sure you get their permission first!


Site Design By Designer Blogs